当你使用脚本检测流媒体解锁时,可能会发现Youtube premium被标记为CN,恭喜你不用买会员也可以享受到无广告的Youtube了。为什么会这样呢?猜测的原因有:使用代理时开启了定位或开启了Google账号位置记录;你的VPS邻居开启了定位导致IP段被标记。以下将说明其他特征与解决方案。
特征
- Gmail与Youtube会在首页隐藏图标,你可以输入网址访问。
- 默认开启安全搜索,不显示敏感内容,你可以在设置中关闭安全搜索。
- 搜索页面下方会显示Google标记你的位置信息,你可以使用虚拟定位更新这一位置。
- https://google.com会自动跳转到
google.com.hk,你可以使用https://google.com/ncr。 - https://www.youtube.com/red显示当前地区不支持会员,你无法购买Youtube会员。
解决方案
解决方案分两种,一种是向Google报告IP问题,但我在报告IPv6时总是提醒我IP地址无效;另一种是模拟定位,让你的位置信息被Goole重新读取。两种方法的快慢因人而定,可能几个小时也可能一天,或许也都需要接近一个月的时间。
报告IP
点击输入IP地址和国家,持续向Google报告即可。
虚拟定位
虚拟定位的方法也有两种,操作得当会立即改变搜索页面下方的位置信息,而这也是最关键的一步。手机只需要下载虚拟定位软件即可,以下详细介绍电脑浏览器更改位置信息的方法。
首先打开地图,搜索城市查找要定位的位置坐标。然后打开Chrome浏览器访问Google首页搜索我的位置,先不要给网站位置权限,鼠标右键打开开发者工具->检查依次点击标红位置。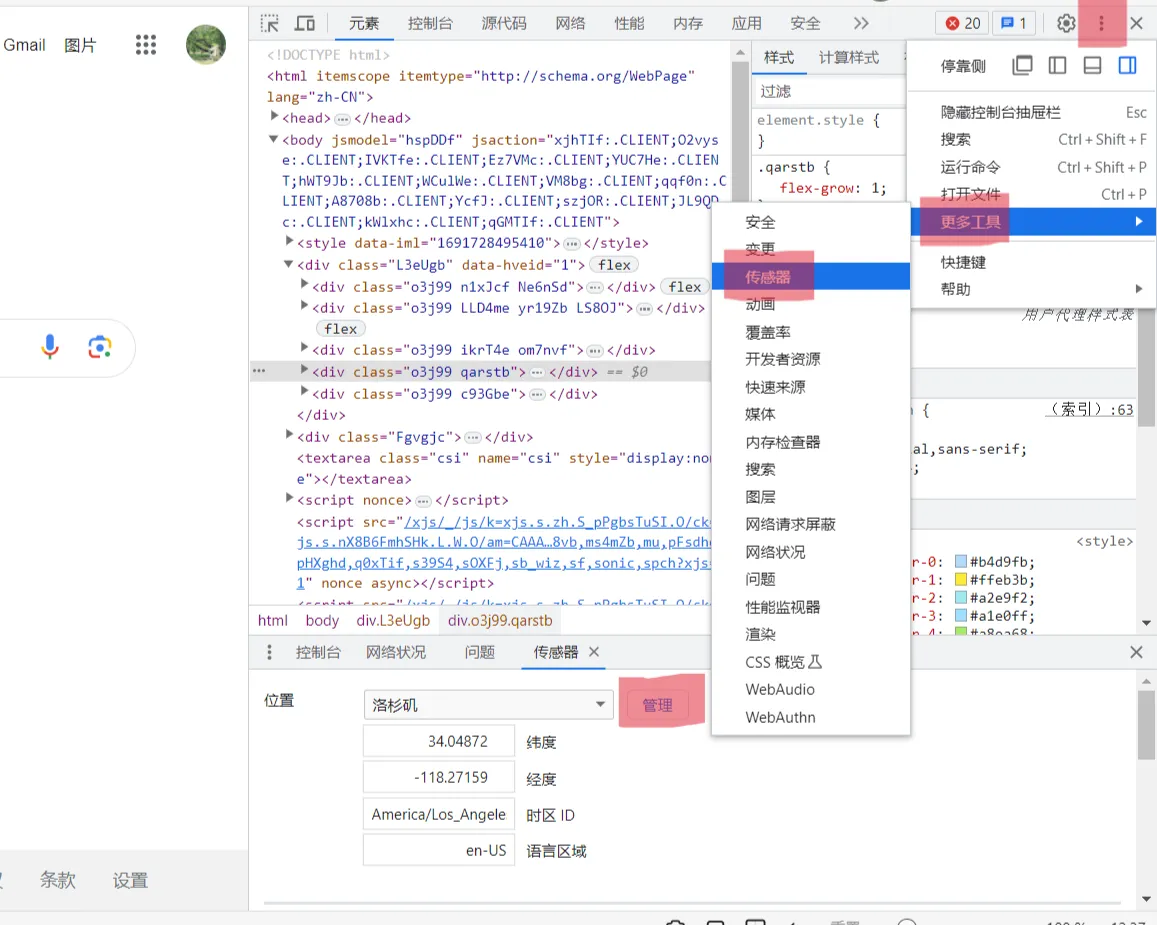
点击管理之后添加位置,输入位置名称、经纬度及其他信息添加即可。然后再次来到管理点击左侧方框选择刚刚创建的位置名称。紧接着刷新网页,允许网站获得定位权限,点击搜索结果第一行的使用确切位置的定位按钮。现在你的位置就是你输入的坐标,来到网页最下方会看到*** - 根据您的活动记录 - 更新位置信息,点击更新位置信息即可。最后要做的就是等待。